How to Build a Horse Jump: A Comprehensive Guide
October 24, 2024Building your own horse jumps is a rewarding experience that allows you to customize obstacles to your horse’s ability and create a unique course. Whether you’re a seasoned equestrian or just starting out, this comprehensive guide will provide you with all the information you need to build safe and sturdy horse jumps.
Planning Your Horse Jump
Before you grab your tools, careful planning is essential for a successful horse jump construction.
Determine the Type of Jump
There are numerous horse jump styles, each serving different training purposes. Consider the skill level of both you and your horse:
- Cross Rails: Ideal for beginners, these jumps consist of two rails placed at an X shape, encouraging horses to jump in the center.
- Vertical Jumps: A single rail placed horizontally, adjustable for different heights, helps improve a horse’s technique over fences.
- Oxers: Wider than verticals, oxers consist of two rails with the back rail higher, encouraging better form and careful jumping.
Choose the Right Materials
Selecting durable and safe materials is crucial for your horse jump’s longevity and your horse’s well-being.
- Jump Rails: Opt for lightweight yet sturdy materials like wood (pine or spruce) or PVC.
- Jump Standards: Wooden posts are a popular choice, but you can also use PVC pipes or metal poles for added stability.
- Jump Cups: Choose from various materials like plastic, rubber, or metal, ensuring they fit your rails securely and release easily upon impact.
Building Your Horse Jump
With your plan in place and materials gathered, it’s time to start building!
Step 1: Prepare the Jump Standards
- Cut the standards: Using a saw, cut your chosen material to your desired jump height. Remember to factor in the height added by the jump cups.
- Smooth the edges: Sand down any sharp edges or splinters on the standards to prevent injuries to both you and your horse.
- Apply a protective finish (optional): Painting or sealing your wooden standards can extend their lifespan and enhance their appearance.
Step 2: Attach the Jump Cups
- Mark the cup placement: Measure and mark the desired height for your jump rails on the standards.
- Secure the jump cups: Depending on the type of cups you’ve chosen, you’ll either screw them directly into the standards or use brackets for added stability.
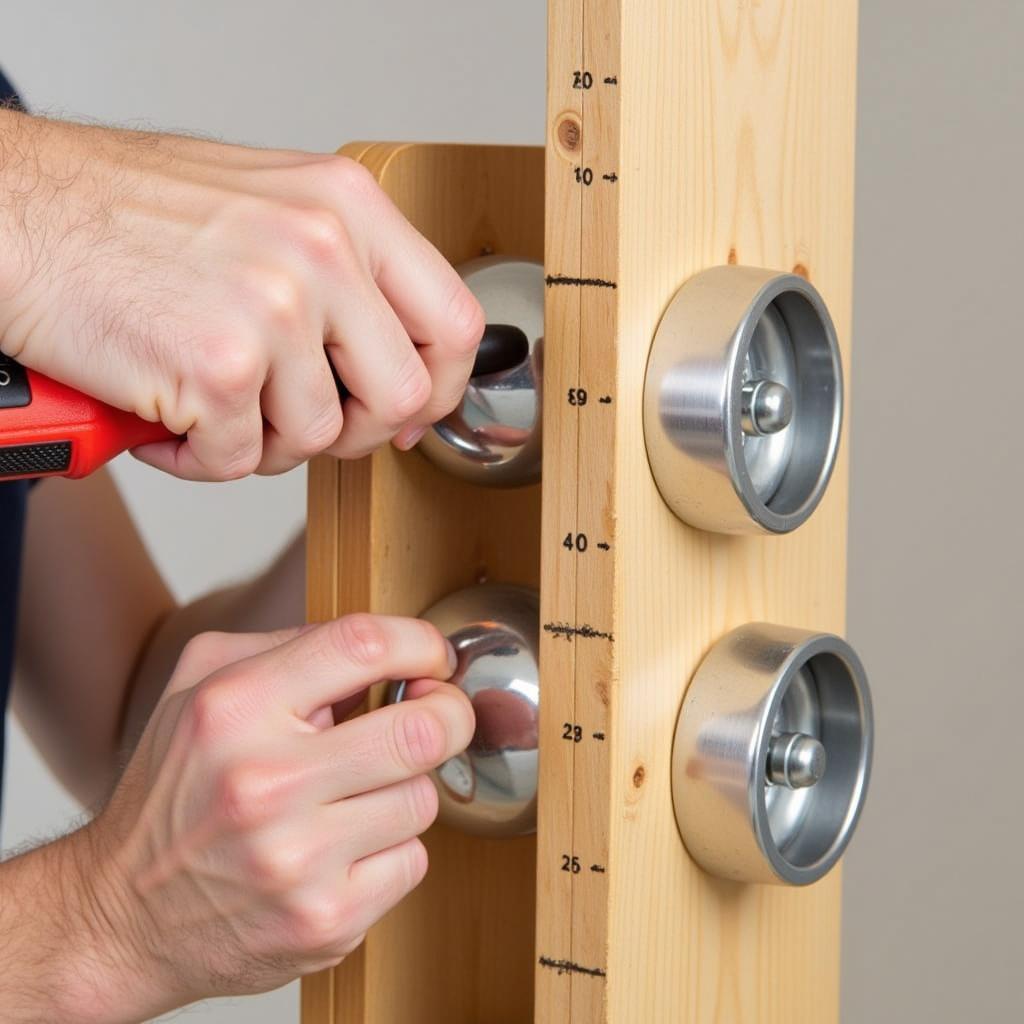 Securing Jump Cups to Wooden Standards
Step 3: Add the Jump Rails
- Place the rails: Carefully lay the jump rails into the jump cups, ensuring they are evenly balanced.
- Check for stability: Gently shake the jump to make sure it’s sturdy and won’t easily topple over.
Safety Considerations
- Start low and gradually increase height: Allow your horse to get accustomed to the new jump by starting with lower heights and progressively raising them as their confidence grows.
- Use ground lines: Placing ground lines on either side of the jump can help your horse judge the distance and take off point.
- Inspect your jumps regularly: Before each use, check for any loose screws, cracks, or wear and tear that might compromise the jump’s integrity.
Conclusion
Building your own horse jump is an achievable project that can significantly enhance your training experience. By following these steps and prioritizing safety, you can create a fun and challenging environment for you and your horse to enjoy.
FAQs
Q: What is the ideal height for a beginner horse jump?
A: For horses and riders new to jumping, start with cross rails set at a comfortable height of around 2 feet.
Q: Can I use recycled materials to build a horse jump?
A: While it’s possible to repurpose materials, ensure they are structurally sound and safe for use around horses. Avoid using materials with sharp edges or protruding nails.
Q: How often should I replace my horse jump rails?
A: Regularly inspect your rails for signs of wear and tear. Depending on usage and exposure to the elements, wooden rails may need replacement every 2-3 years.
Need further assistance?
Contact us at Phone Number: 0915117113, Email: [email protected], or visit us at: Hamlet 3, Binh An, Phu Thuong, Vietnam, Binh Phuoc 830000, Vietnam. Our customer support team is available 24/7.